Head First Design Patterns
- Strategy Pattern
- Observer Pattern
- Decorator Pattern
- Factory Pattern
- Singleton Pattern
- Command Pattern
- Adapter and Facade Patterns
- Template Method Pattern
- Iterator Pattern and Composite Pattern
- State Pattern
We can think design patterns as a set of best practices in Object-Oriented Design (OOD). It gives us a shared vocabulary, and simplifies communications with others by thinking at the pattern level instead of the nitty-gritty object level.
This book contains most of the design patterns defined in the textbook “Design Patterns: Elements of Reusable Object-Oriented Software”. For each pattern, I will summarize its design principles, definition, relation graph among example classes, with some code snippet.
Strategy Pattern
Definition: strategy pattern defines a family of algorithms/classes, encapsulates each one, and makes them inter-changeable. Strategy lets algorithms vary independently from clients that use it.
Design Principle:
- Encapsulate what varies: identify the aspects of your application that vary and separate them from what stays the same.
- Program to an interface, not an implementation.
- Favor composition over inheritance.
Composition means a HAS-A relationship, whereas inheritance means IS-A. Composition gives many benefits such as loosely-coupled class structures, dynamically changing behaviors at runtime, etc.
We use an example to demonstrate the disadvantages of not using the pattern and how strategy pattern resolves them by applying these design principles.
Suppose we are designing a Duck class hierarchy, in which each type of duck can fly and quack but their flying/quacking behaviors are not the same. First, let’s see two designs without strategy pattern:
- Use inheritance: first define an abstract
Duckclass with two abstract methods (fly,quack). Then for each actualDucksubclass, we inherit fromDuckand implement the two methods. - Use interface: first define an abstract
Duckclass and two interfaces (Flyable,Quackable). Then for each actualDucksubclass, we inherit fromDuckand implement the two interfaces when necessary (e.g., oneDuckcan only fly).
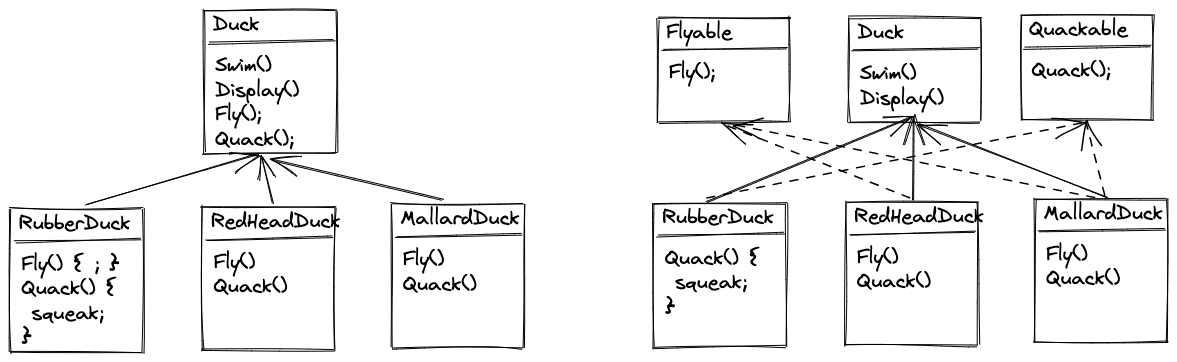
Both of the two designs have disadvantages, for example:
- Classes are tightly-coupled: we cannot separate
Ducks from behaviors. If we want to change a behavior implementation, we have to change all the client code (Ducks) that use this behavior (implementations). If $n$Duckclasses use the behavior, we have to change it in all $n$ classes. - Low-level code reusing: if we want to create a
DuckCallclass hierarchy, we cannot reuse thequackbehaviors defined inDucks. - Behaviors are binded to a class implementation and cannot be changed at runtime: after initializing a
Duckobject, we cannot change its behaviors.
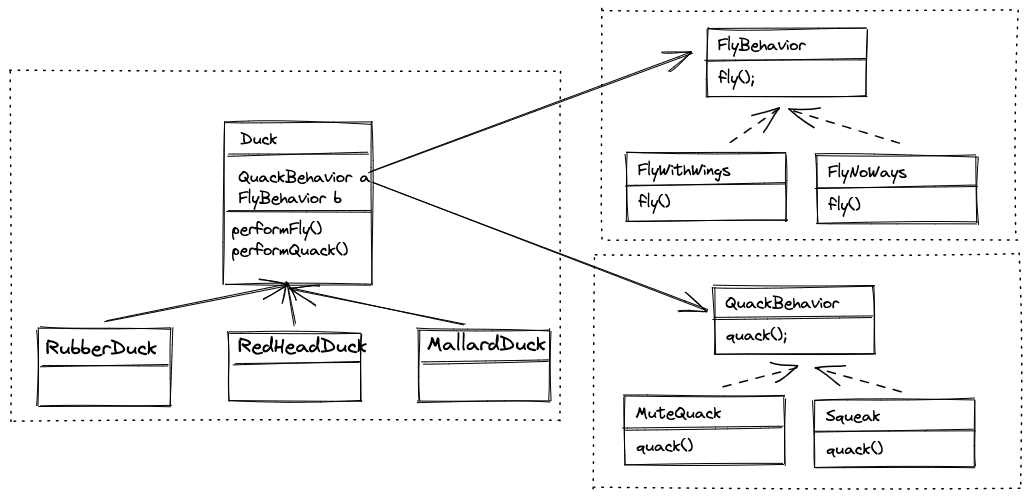
Let’s see how strategy pattern can mitigate these issues. We know that what changes are behaviors not ducks. So we first separate the two behaviors from ducks by defining two interfaces, FlyBehavior and QuackBehavior, each of which has a set of classes implementing the behavior (Principle 1). Then, we add two objects of the interfaces to the (abstract) Duck class that hold the specific behavior implementations (Principle 2 and 3). Finally, for different types of Ducks (subclasses), we just need to pass the expected behavior implementations (Principle 3).
Now, let’s discuss how the design with strategy pattern resolves the disadvantages mentioned:
- We have a loosely-coupled class structures where client code (
Duck) is separated from algorithms (FlyBehaviorandQuackBehavior). If we want to change a behavior implementation, we don’t need to change client code. - Since we already encapsulate behavior implementaions into separate interface/class structures that are not binded to client code, we can use them in other client code (e.g.,
DuckCall) via composition. - We no longer bind behaviors to client code implementations. Instead, we use composition that holds behavior objects, so we can change the objects at runtime.
The key here is that, a duck now delegates its flying and quacking behaviors to coresponding behavior objects, instead of using quacking/flying methods defined in the Duck class (or subclass).
Observer Pattern
Keep objects notified when something they care happens. Publishers/Subject + Subscribers/Observers = Observer Pattern
Definition: observer pattern defines a one-to-many dependency between objects so that when one object changes state, all of its dependents are notified and updated automatically.
Design Principles:
- Strive for loosely coupled desings between objects that interact.
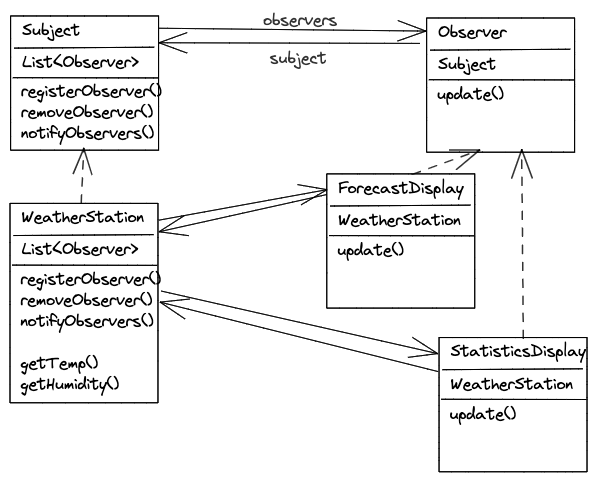
Observer pattern can be used in scenarios where a set of objects want to be automatically notified by a subject whenever it has updates. For example, weather displays want to be notified/updated whenever the weather station has new data. Or in GUI, action listeners want to be called whenever the button they listen to is triggered. In general, observer pattern has two parts:
- A subject class: the subject can add/remove observers and send updates to them. It also has a
list(setalso works) to save the set of subscribed observers. - A
Observerinterface: an observer will hold a subject so that it can (un)subscribe the subject. It also has a singleupdate(or other name) method that will be called by the subject whenever it has update. - A set of classes that implement the
Observerinterface.
class WeatherStation {
private:
  std::vector<Observer *> observers;
  // And more data, e.g., temperature.
public:
  void registerObserver(Observer *);
  void removeObserver(Observer *);
  void notifyObservers();

  // And getters so that observers can pull data from subject.
}

class Observer {
private:
  WeatherStation *subject;
public:
  void update();  // Called by subject whenever it has update to send.
}
How Observer Pattern Achieves Loose Coupling:
- The only thing the subject knows about an observer is that it implements a certain interface (
Observerinterface). - We can add or remove observers at any time.
- We don’t need to modify the subject to add new types of observers. We just create the new type which implements the
Observerinterface. - We can reuse subjects and observers independently of each other.
- Changes to either the subject or an observer will not affect the other.
How to transfer the new data between subject and observers: subject can push data to observers via method arguments in Observer interface. Or observers can pull data from subject through its getter when there is update. Usually pull is more “correct” and extensible. If you use push, you may need to change the method API to include new arguments in the future.
Decorator Pattern
Definition: decorator pattern attaches additional responsibilities to an object dynamically and transparently. Decorators provide a flexible alternative to subclassing for extending functionality. Instead, decorators use subclassing only for type matching.
Design principles:
- Open-Closed: classes should be open for extension, but closed for modification.
Intuitively, we wrap the original object with one (or more) decorator(s), in a way such that the object can be used the same way (same APIs) as before, except that now it also have functionalities from these decorator(s). To make it work transparently:
- Decorators need to have the same APIs/interface as the object they decorate (inherit from the same interface or abstract class).
- Decorators need to HAS-A (wrap) an object, such that they can still access the object while adding new functionalities.
- We can implement decorator pattern by having a Decorator interface and a set of concrete Decorators classes that implement this interface and hold the decorating functionalities.
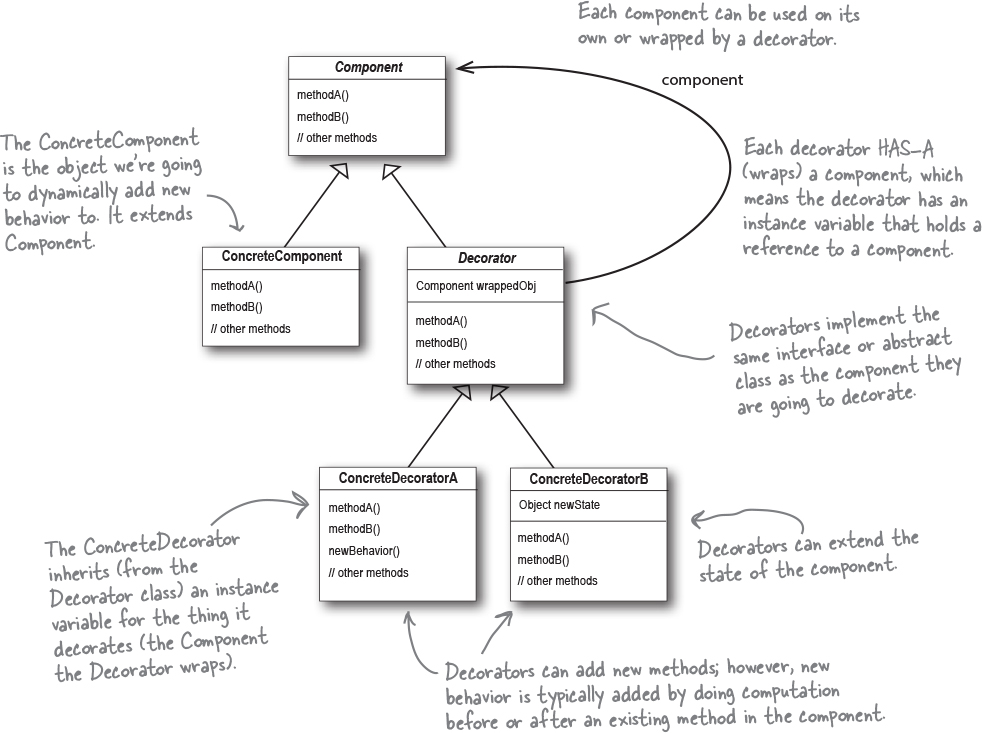
The below figure (from the book) shows the class structure of decorate pattern. Overall it consists of four types of elements:
- Component: the interface/abstract class that is implemented by both concrete components and decorators. Concrete components inherits it to implement expected behaviors, while decorators inherits it only for type matching.
- Concrete component: the set of objects/classes that can be decorated by decorators.
- Decorator: usually we also have an interface/abstract class so that we can have various concrete decorators that implement different decorations.
- Concrete decorators: various decorators that provide decoration implementations.
Decorator pattern only works when you write code against the abstract component type, not the concrete component type. A concrete component will lose its own APIs (those not in the interface) after wrapped by a decorator. An example of decorator pattern is the Java.io package.
Let’s end up with a simple code snippet to demonstrate these elements:
// Base class. Every class/interface IS-A `Component`.
#include <string>

using std::string;

class Component {
public:
  virtual string description();
  virtual double price();
};

// Implement `Component` behaviors.
// Notice here, by using decorators, we will no longer have access to
// `ConcreteComponent`'s own behaviors, such as `discountPrice`.
class ConcreteComponent: public Component {
public:
  string description() override { return "coffee"; }
  double price() override { return 2.0; }
  double discountPrice(double percent) { return price() * percent; }
}

// Base decorator class. Decorator also IS-A Component, but only for type
// matching, not for extending behaviors. It HAS-A `ConcreteComponent`
// (composition).
class Decorator: public Component {
public:
  Decorator(Component *comp) : component(comp) { }
protected:
  Component *component;
}

// Implement `Decorator`.
class ConcreteDecorator: public Decorator {
public:
  ConcreteDecorator(Component *comp): base(comp) { }
  string description() override { return "milk " + component->description(); }
  double price() override() { return 0.15 + component->price(); }
}

int main() {
  Component *coffee = new ConcreteComponent();
  Component *coffeeWithMilk = new ConcreteDecorator(coffee);
}
Factory Pattern
In Object-Oriented world, we usually have various classes that implement the same interface (e.g., different types of Pizza). This makes it difficult to creat object correctly and concisely, because we need to create a concrete object based on some inputs from user. And the same logic might be scattered across different locations in your codebase.
Imagine you need to “create” different
Pizzaobjects based on astringinput. And you need thePizzacreation logic both increatePizzaandshowPizzaMenu(or other) methods.
Factory pattern simplifies object creation by putting all object creation into a single place (either a factory method or a factory class). It has two main benefits:
- Decouple object creation from client code (code that uses the objects): client code no longer need to know how to create various objects. Whenever it needs an object (say, a
Pizza), it can create the object by using the factory. - Provide a consistent way of creating objects: only the factory knows and has the logic of object creation. Whenever we update the logic, we only need to change the factory.
Simple Factory
Simple factory is not a real design pattern, but it’s a widely-used type of factory. We simply put the object creation logic to a new Factory class, and whenever client code needs objects, it can use the Factory.
You can either create a factory object and pass it to client code, or write the object creation as a static method in the
Factoryand uses the static method directly in client code.
// Factory class. We only use the static method to create `Pizza`, so put
// constructor in private.
class PizzaFactory {
public:
  static Pizza *createPizza(string pizzaType) {
    if (pizzaType == "cheese")
      return new CheesePizza();
    else if (pizzaType == "pepperoni")
      return new PepperoniPizza();
    else
      return UnknowPizza();
  }
private:
  PizzaFactory() = default;
}

// Client class. It uses factory to create pizza.
class PizzaStore {
public:
  Pizza *orderPizza(string pizzaType) {
    // Deligate pizza creation to the factory.
    Pizza *pizza = PizzaFactory.createPizza(pizzaType);

    pizza->prepare();
    pizza->bake();
    pizza->cut();
    pizza->box();
    return pizza;
  }
}
However, simple factory does have some disadvantages, such as:
- Too flexible to be used correctly: in the above example,
PizzaFactoryandPizzaStoreare two separate classes. After creating aPizza,PizzaFactoryno longer has control over the objects it creates. In fact, any code can use the factory to create pizza. - Not extensible: if we want to have two factories that create NY-style pizzas and Chicago-style pizzas respectively, we need to have two separate
Factorys.
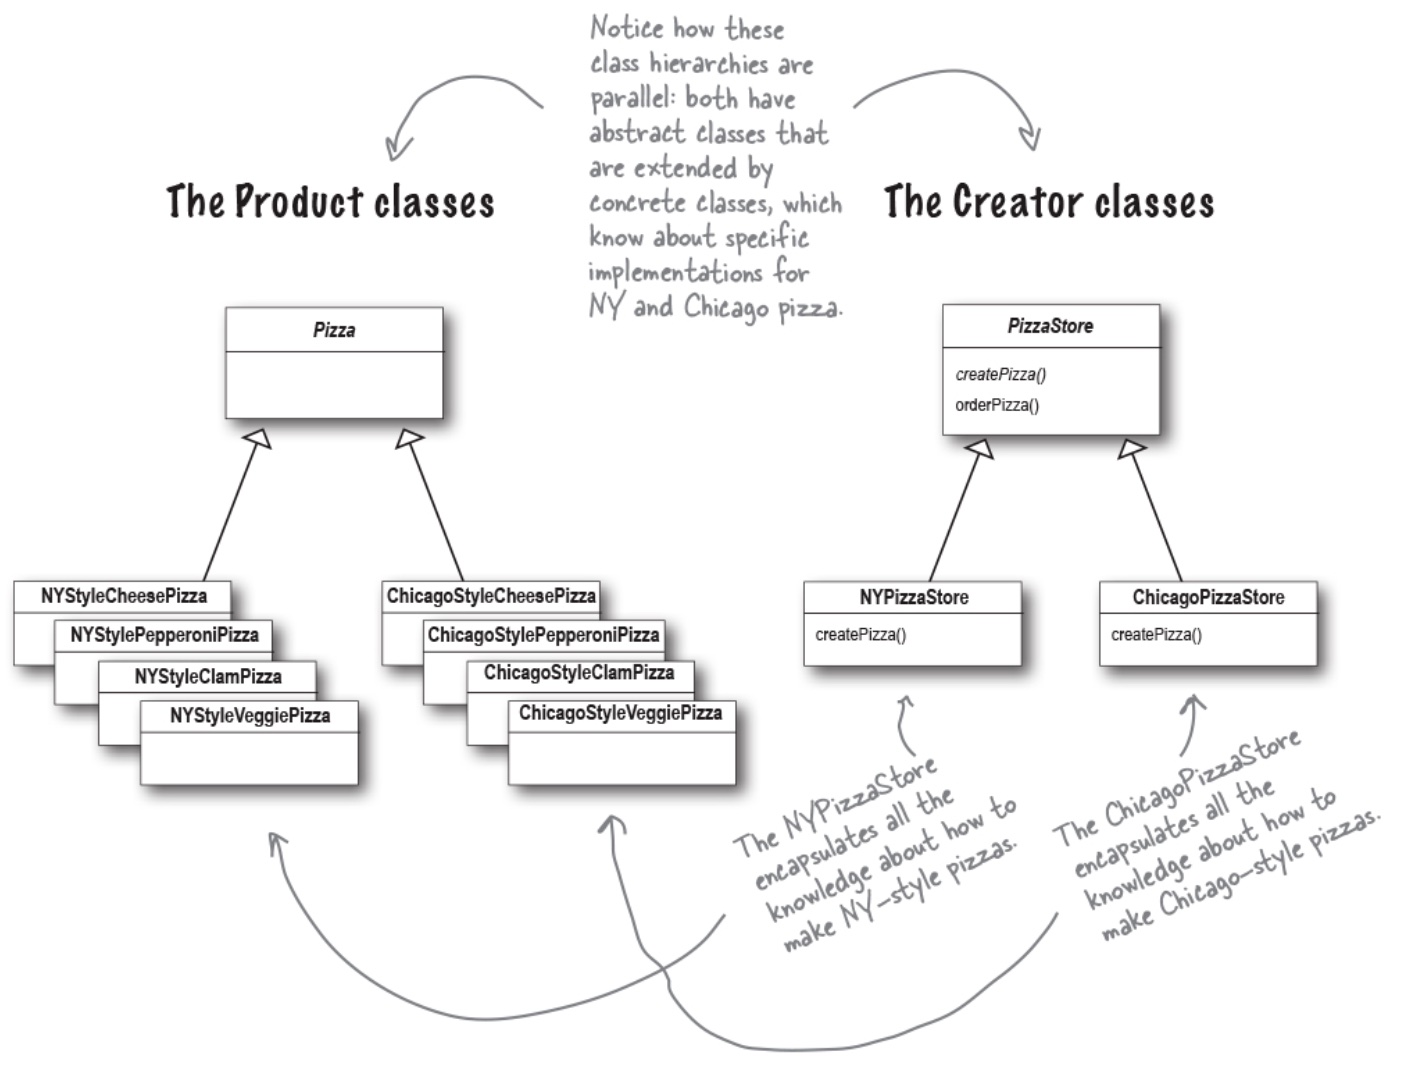
Factory Method Pattern
Definition: factory method pattern defines an interface/method (a.k.a factory method) for creating objects, but lets subclasses decide which class to instantiate. Factory method lets a class defer instantiation to subclasses.
Design principle:
- Dependency inversion principle: depend upon abstractions. Do not depend upon concrete classes.
Now let’s see how factory method pattern resolve disadvantages in simple factory. First, it combines the two classes and moves the createPizza method to PizzaStore. Second, it defers object creation/instantiation to subclasses by declaring the createPizza as an abstract method. Then whenever there is a new style of pizza, we just need to inheriate the base PizzaStore and implement the createPizza method.
createPizzais the so-called factory method. A factory method handles object creation and encapsulates it in a subclass. This decouples the client code in the superclass from the object creation code in the subclass.
class PizzaStore {
public:
  Pizza *orderPizza(string pizzaType) {
    // Subclasses will handle object creation.
    Pizza *pizza = createPizza(pizzaType);

    pizza->prepare();
    pizza->bake();
    pizza->cut();
    pizza->box();
    return pizza;
  }
protected:
  abstract Pizza *createPizza(string pizzaType);
}

class NYStylePizzaStore: public PizzaStore {
protected:
  Pizza *createPizza(string pizzaType) override {
    if (pizzaType == "cheese")
      return new NYCheesePizza();
    else if (pizzaType == "pepperoni")
      return new NYPepperoniPizza();
    else
      return UnknowPizza();
  }
}

class ChicagoStylePizzaStore: public PizzaStore {
protected:
  Pizza *createPizza(string pizzaType) override {
    if (pizzaType == "cheese")
      return new ChicagoCheesePizza();
    else if (pizzaType == "pepperoni")
      return new ChicagoPepperoniPizza();
    else
      return UnknowPizza();
  }
}
As we can see, with factory method pattern, we can extend our PizzaStore to include different styles of pizza. Also only PizzaStore can create pizzas using the factory method (and the orderPizza method is also fixed, no other changes possible).
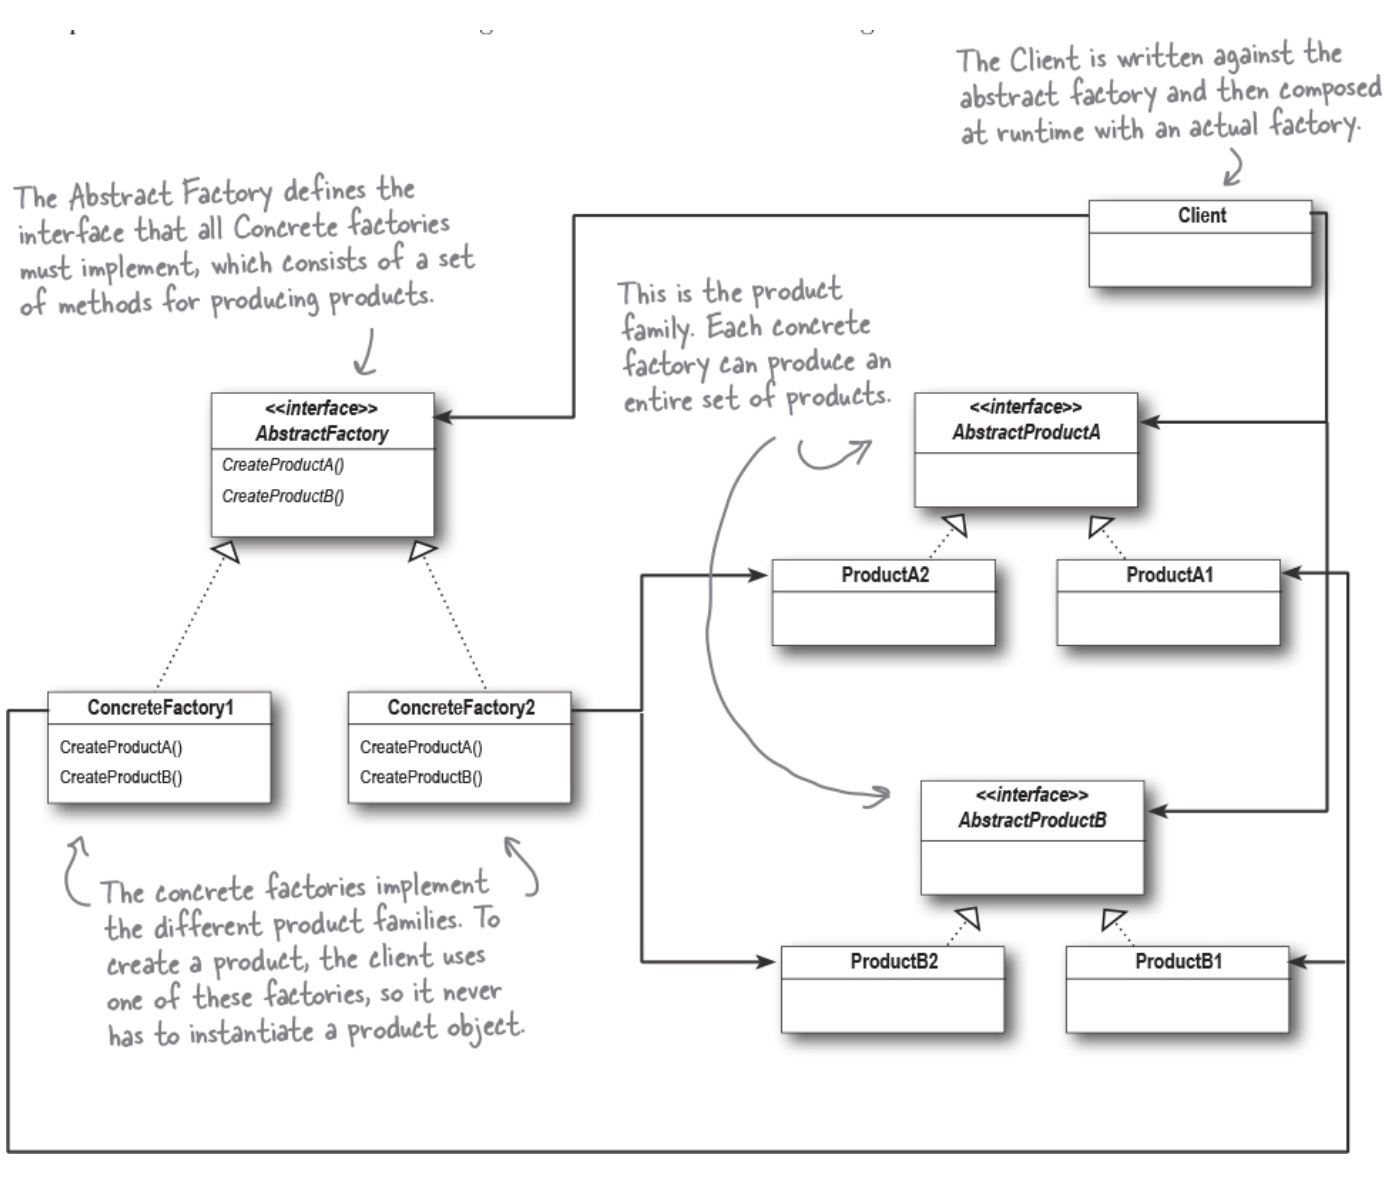
Abstract Factory Pattern
Definition: abstract factory pattern provides an interface for creating families of related or dependent objects without specifying their concrete classes.
Compared to factory method pattern which decouples object creation from client code by inheritance, abstract factory method uses composition to create different factories that follow the same Factory interface. Then with the same client code, we can create different types of objects by passing different factories.
Let’s assume that the key difference between different pizza styles is ingredients used. Then we can create an PizzaIngredientFactory interface, based on which we create two classes that implement the interface and provide ingredients for a specific pizza style. Every concrete Pizza class will hold a PizzaIngredientFactory reference and use it to produce different styles of pizza. When we implement concrete PizzaStores, we just need to pass the corresponding PizzaIngredientFactory (e.g., NYPizzaIngredientFactory) to the createPizza method.
By using abstract factory pattern, we also reduce the number of concrete Pizza classes needed. For example, we no longer need two cheese pizza classes (NYCheesePizza, ChicagoPepperoniPizza). Instead, we only need one CheesePizza and let the PizzaIngredientFactory passed to it decide the specific style.
Singleton Pattern
Sometimes we need one and only one instance of a class for some spefic tasks, such as resource management, thread pool, cache, etc. Having multiple instances will mess up the underlying resources.
Definition: singleton pattern ensures a class has only one instance, and provides a global point of access to it.
Below is a simple singleton pattern implementation in c++. Basically, we need 3 parts in a singleton pattern:
- Private constructor: ensure no external code can create an instance.
- Private static object: hold the only instance of the class.
- Public static
getInstancemethod: create the only instance if yet created and return the reference of the singleton.
class Singleton {
public:
  static Singleton const *getInstance() {
    if (uniqueInstance == nullptr) {
      uniqueInstance = new Singleton();
    }
    return uniqueInstance;
  }

  // other methods here.
private:
  static Singleton const *uniqueInstance;

  Singleton() {}
};
Although being a simple pattern, singleton pattern can be tricky when used with other programming tools such as inheritance, serialization/deserialization, reflection, etc. For example, in multithreading setting, the above code will accidently create more than one instance if getInstance is called simutaneously by multiple callers. There are several fixes for this issue:
- Make the
getInstancemethod asyncronizationmethod. Easy but add high overhead. - Eagerly create the instance instead of lazy creation. No sync/lock needed, but one instance is created no matter if it’s used.
- Reduce the use of
syncronizationby only locking theobject creationpart. E.g., if the object is created, return it directly. Add low overhead but hard to implement correctly.
Singleton v.s. Enum
In some languages like Java, singleton pattern can be easily implemented as an Enum. Conceptually they are similar as both have only one instance.
public enum Singleton {
  UNIQUE_INSTANCE;
  // more field here.
}

public class SingletonClient {
  public static void main(String[] args) {
    Singleton singleton = Singleton.UNIQUE_INSTANCE;
    // use singleton here.
  }
}
Command Pattern
Suppose we have many different devices, all of which can be turned on/off but the exact actions to do it are different. We want to design a unified remote control that is able to turn on/off these devices by pressing corresponding buttons. If we embed a device’s actions for that request to a specific button, there will be at least two disadvantages:
RemoteControlclass andDeviceare tightly coupled. To modify a button’s request, we have to changeRemoteControl’s code.- We cannot dynamically change a button to handle another type of request.
Not to mention that such a design violated many OO principles, such as: programming to interface, not implementation, loosely couple, etc.
Command pattern can be used to overcome these disadvantages given such a requirement.
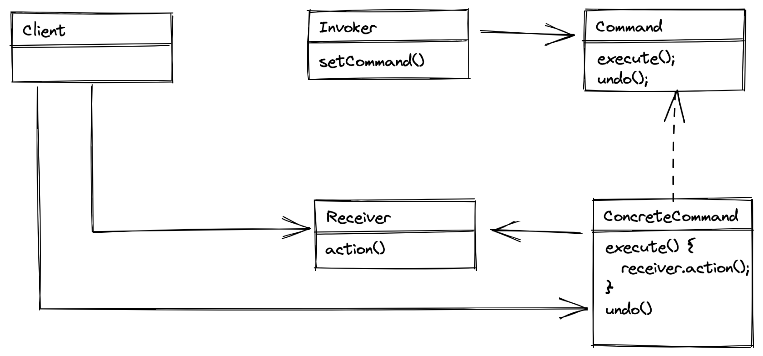
Definition: command pattern encapsulates a request as an object (Command), thereby letting you parameterize other objects (Receiver) with different requests, queue or log requests, and support undoable operations.
The command object is like a surrogate between invokers (that send requests) and receivers (that need to do the actions).
Usually a command pattern implementation includes the following components: client, invoker, command, receiver. Let’s go throught them from easy to hard.
Receivers are just some concrete classes that can make actions based on request, such as Light (On/Off), GrageDoor (Open/Close), etc.
Command is the key to decouple invokers and receivers. It’s an interface based on which various concrete command implementations encapsulate different receivers and use them to complete requests (via the interface method execute).
class Command {
public:
  virtual void execute();
};

// here the `light` is the receiver, and `on()` is the action.
class LightOnCommand: public Command {
public:
  LightOnCommand(Light *light) {
    this.light = light;
  }

  void execute() {
    light->on();
  }
private:
  Light *light;
}
Now that we have a receiver and command, how can we load and use them. Invoker comes to help by holding a command and ask the command to execute a request at some point. So an invoker has two functionalities: set a command and ask it to execute. For example, we may have a remote control invoker that is responsible for turning on a light (let’s also assume we can dynamically change the Command it holds):
class RemoteControl {
public:
  void setCommand(Command *command) {
    this.command = command;
  }

  void pressButton() {
    command->execute();
  }

private:
  Command *command;
};

int main() {
  RemoteControl invoker;

  // Command
  Command *lightOn = new LightOnCommand(new Light());
  Command *grageOn = new GrageOnCommand(new Grage());

  // Notice the invoker is decoupled from actual receivers,
  // and can complete different requests using the same interface.
  invoker.setCommand(lightOn);
  invoker.pressButton();

  invoker.setCommand(grageOn);
  invoker.pressButton();
}
Notice in the above code, we simply create two commands and load them to the invoker in the main function. In real world, there might be a lot of commands and we need to load them all to their invokers. That’s done by a specific class called Client. For example, a real RemoteControl might have 7 command slots for turning on receivers and another 7 for turning off receivers. Then a client will be responsible for creating these receivers, binding them to corresponding OnCommand/OffCommand, and returning the complete RemoteControl for real usage.
Additional functionality
Lambda expression
In some languages such as Java, we can use lambda expressions in replace of command classes, which can significantly simplify the code. Notice this only works if the Command interface has one abstract method.
Add more methods to Command
Say we want the RemoteControl to be able to undo its last command. We need to make two changes. First, for each Command, we need to define how to undo the Command by adding a undo method in the Command interface. Then the RemoteControl also need to the last Command object it invokes.
class Command {
public:
  virtual void execute();
  virtual void undo();
};

class LightOnCommand {
public:
  // ... same code.

  void undo() {
    this.light->off();
  }

private:
  // ... same code.
};

class RemoteControl {
public:
  // Add a new `undo` button (invoker)
  void pressButton() {
    // Now we need to update the `lastCommand` invoked.
  }
  void pressUndoButton() {
    this.lastCommand->undo();
  }
}

private:
  // ...same code.
  Command *lastCommand;

  #### MacroCommand

Sometimes we want to have a "smart" command that is able to complete multiple commands at once, in which we can use `MacroCommand` A `MacroCommand` object holds a `Command` array and, when called, executes all `Commands` one by one.

```cpp
class MacroCommand: public Command {
public:
  MacroCommand(Command[] commands) {
    this.commands = commands;
    this.length = sizeof(commands)/sizeof(commands[0]);
  }
  void execute() {
    for (int i = 0; i < this.length; i++) {
      this.commands[i].execute();
    }
  }

  void undo() {
    for (int i = this.length - 1; i >= 0; i--) {
      this.commands[i].undo();
    }
  }
}
Using command pattern for logging requests
In some applications, especially distributed applications, the system need to log all the requests it handles. In crash happens, the system re-executes all requests since last checkpoint to recover its state.
Using command pattern, we can add two methods, store() and load() to the Command interface. Whenever an execute happens, we store the Command on disk by seralizing the object. After the system recovers from crash, we load all stored commands and execute them in batch.
Notice in some languages we need to handle some seralization/deseralization caveats.
Adapter and Facade Patterns
We know that the decorator pattern is used to add new functionality while keeping an interface unchanged. It accomplishes this by wrapping an interface object and implementing the same interface.
Adapter and facade patterns are two patterns that also wraps interfaces/classes, but for different purposes: one is to changing an interface (or interfaces) to another, and the other is to simplify an interface (or interfaces).
Adapter pattern
Definition: adapter pattern converts the interface of a class into another that the clients expect, making classes with incompitable interfaces able to work together.
For example, a client expects a class implementing interface A (target), while we have a class implementing interface B (adaptee). We can define a class Adapter that holds a reference to B and implements A by using the B object. By using Adapter, all classes that implements B can be used in places where A is expected.
class Walker {
public:
  abstract void walk();
};

class Runner {
public:
  abstract void run();
};

class WalkerAdapter: public Runner {
public:
  WalkerAdapter(Walker *w): walker(w) { }

  void run() {
    for (int i = 0; i < 5; i++) {
      walker->walk();
    }
  }
private:
  Walker *walker;
};

int main() {
  Walker *walker = new ConcreteWalker();
  Runner *runner = new WalkerAdapter(walker);

  // Now we can use the runner as usual. Under the hook,
  //  it's the adaptee, walker, who is running.
  runner.run();
}
Facade pattern
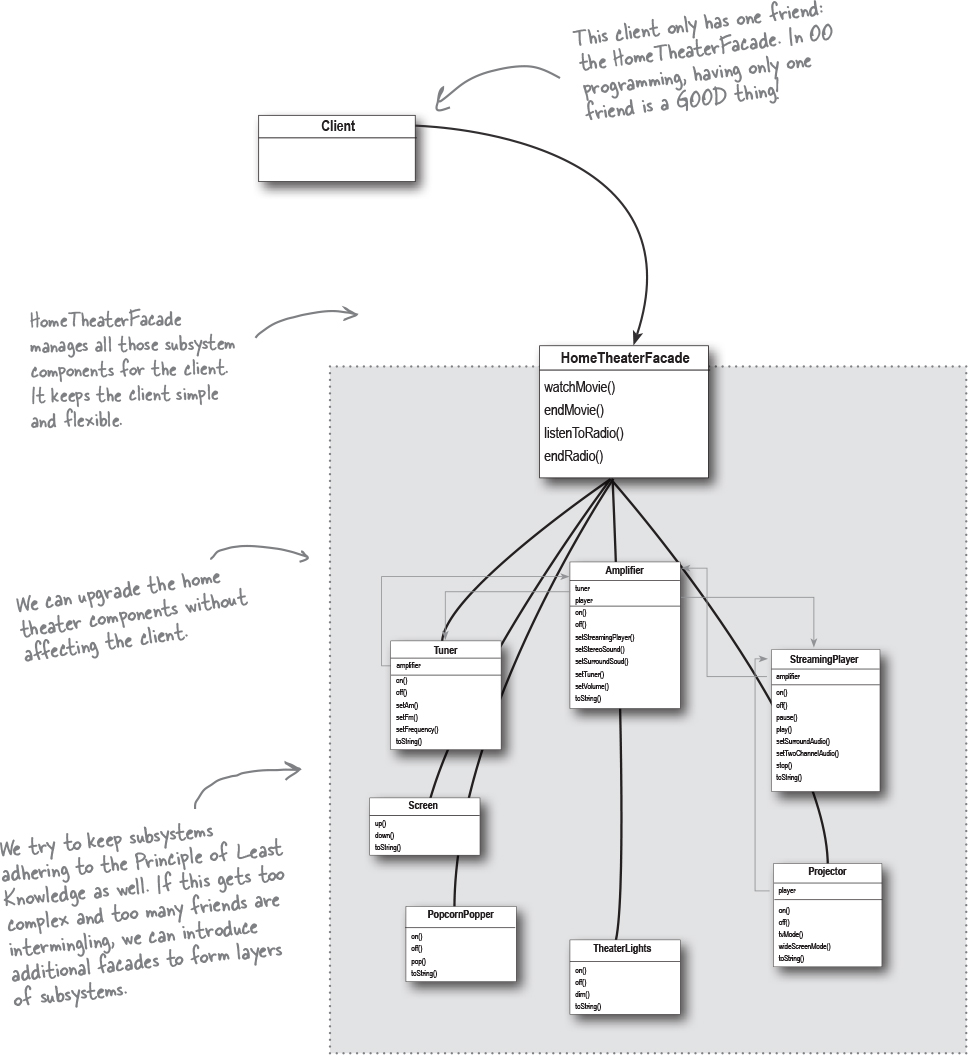
Definition: facade pattern provides a unified interface to a set of interfaces in a subsystem. It makes the subsystem easier to use by providing a higher-level interface. (e.g., imagine it as a wrapper class of a set of objects.)
Suppose we have a complex home theather system which consists of many devices such as projectors, screens, amplifiers, etc. The client (e.g., a controller) need to open them all when watching a movie and close all after watching. Moreover, if we want to upgrade the system, we have to change the client code to use the upgraded devices.
Instead, we can have a Facade class (better let the vendor supply it) that holds the complex system and defines some common methods, such as watchMoive, endMoive, etc. With the Facade, we no longer need to care how the system operates under the hook. Even when we want to upgrade the system, we don’t need to change our client code, but only need a new Facade. Below is a class diagram with a Facade on top of a theather system:
Principle:
Least knowledge (a.k.a., law of demeter): talk only to your immediate friends. Reduce the interactions between objects to just a few close “friends”.
What the principle suggests is that, we need to find the correct abstractions when we have many different objects in our system. If we simply use all directly, they will be tightly coupled and hard to extend. Instead, we should put objects that are more related into a Facade with simplified methods and let others use the Facade.
Template Method Pattern
TODO
Template method pattern defines an algorithm in a method (template method) which consists of multiple steps (other methods). These steps can be abstract methods and implmentations can be left to concrete sub-classes.
Iterator Pattern and Composite Pattern
TODO
Iterator pattern provides a unified way of iterating a collection of elements, by using hasNext() and next() methods. Often we can implement a Iteratable interface that returns an iterator object, so that we no longer need to care which types of Iterator we are using.
Composite pattern is good at representing a tree structure, by using a Component interface. A Component can be either an Item (a leaf that has no child), or a Composite that consists of a set of other Component (where recursion happens).
State Pattern
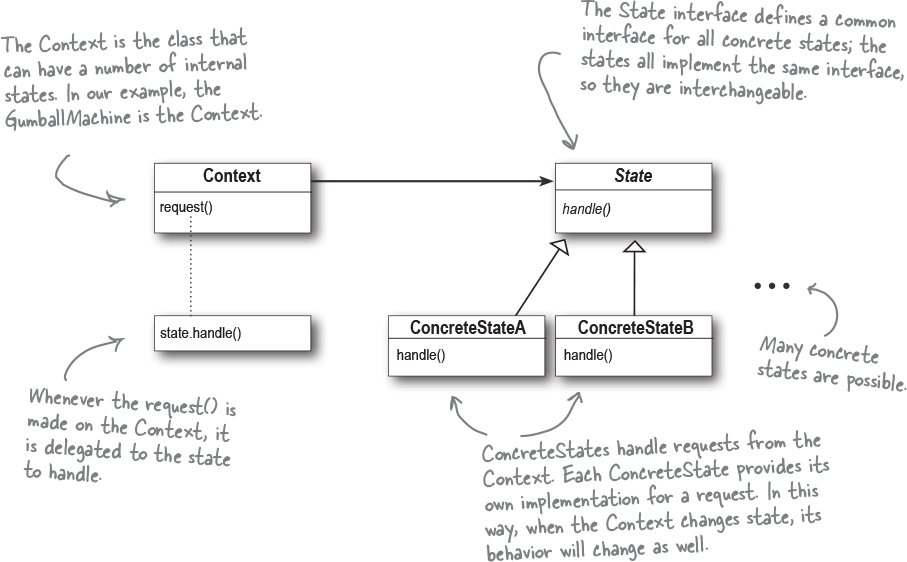
Definition: the state pattern allows an object (Context) to alter its behavior when its internal state (State) changes. The object will appear to change its class.
State pattern fits the senario where you have a set of actions and states. Each action has different behaviors at a given state. And a state will transit to another state when an action happens. For example, a simple vending machine might have two states (in-stock and out-of-stock) and two actions (purchase, replenish). Given the in-stock state, purchase will decrease the machine’s stock count while replenish will increase. If after any action the stock count becomes 0, the state is transitted to out-of-stock.
A simple but non-extensible implementation can be that we use enums to represent states and implment each action as a function which has different behaviors conditioned on states. However, such a design is not well-encapsulated. If we want to add a new state, we need to update all functions to include it. The same applies if we want to change the behaviors given a state.
By using the state pattern, we decouple different states and encapsulate them into individual classes. All concrete states implement the same State interface, which defines all supported action methods. Each concrete state is responsible for implementing the action behaviors.
There is also a Context class (e.g., the vending machine) that interacts with users and holds an State object (and metadata, such as stock count, etc). Context delegates the actions from users to the State it holds, and possibly change the State to another one.
Some implmentation considerations:
- A
Contextobject usually holds and initializes allStateobjects at once such that later on it doesn’t need to createStateobjects whenver state transition happens. - State transition can be controlled either by
Contextor byState.- If by
State, we can let eachStateholds a reference back toContextand updates itsstateto the new one. - If by
Context, usually we need to a fixed state trainsition.
- If by
- The
Stateinterface can be implemented as an abstract class if we want to provide some default implementations.